How to Prepare a Box Dieline and Print-Ready Artwork: Step-by-Step Guide
Most packaging delays and reprints don't come from the factory. They come from artwork: a logo that falls across a fold, text cut off at the edge, a barcode that won't scan, or colors that look different from the screen. The fix is simple: design on a proper dieline and follow a few prepress rules.
This step-by-step guide explains what a dieline is, how to measure for one, and exactly how to prepare print-ready artwork for custom boxes. Bookmark it and share it with your designer.
What Is a Dieline?
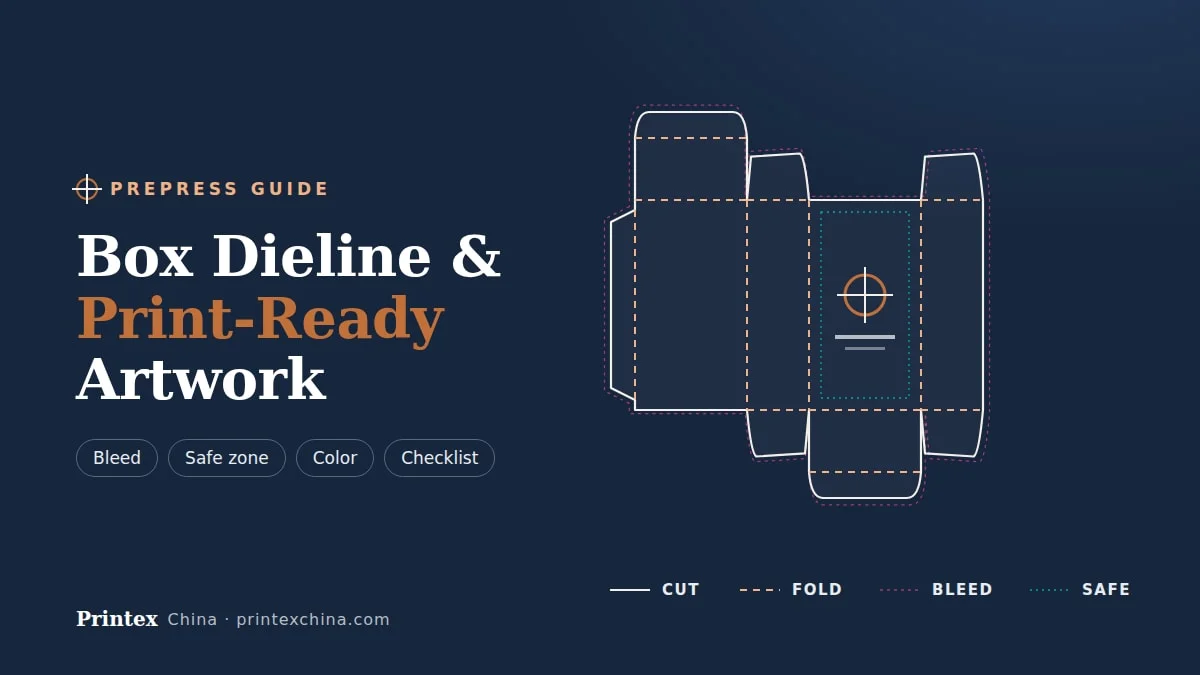
A dieline is the flat, unfolded template of your box. It shows where the board will be cut, folded and glued. The cutting die used in production is built from this drawing, which is why it is called a dieline. Every panel of your design, including the front, back, sides, top, bottom, flaps and inside surfaces, is laid out on it.
Your packaging manufacturer should provide the dieline based on your box style, dimensions and board thickness. If you don't have one, Printex China's engineering team creates dielines from your product measurements at no extra cost when you order.
How to Read a Dieline: Line Types
Dielines use standard line types, usually color-coded and labeled in a legend:
- Cut lines (usually solid): where the board is cut through.
- Crease or fold lines (usually dashed): where the board is scored and folded.
- Perforation lines: partial cuts for tear-off features such as tear strips.
- Bleed line: the area beyond the cut line that your background artwork must extend into, usually 3 mm.
- Safe zone or safety line: the area inside the cut and fold lines where important text and logos must stay, usually 3 mm or more from any edge or fold.
- Glue areas: zones where adhesive is applied. Keep them free of ink, varnish and lamination, or mark them as knock-out areas.
Important: the dieline itself must be on its own layer and set to not print. Never merge it into your artwork.
Step 1: Measure Your Product Correctly
- Measure the product at its widest points: length × width × height, including caps, pumps and any protruding parts.
- Add the insert, if any. The box is sized around the product plus the insert, not the product alone.
- Add clearance: typically a few millimetres in each direction so the product slides in without force but does not rattle.
- Specify inner dimensions to your manufacturer. Board thickness is added outside these measurements, and on rigid boxes and corrugated mailers it makes a noticeable difference.
- Follow the L × W × H convention: length and width describe the opening (the side that opens), and height (depth) is the distance between the openings. Getting this order wrong produces a box that opens on the wrong side.
When in doubt, send us a physical sample of the product. It is the most reliable way to get the fit right.
Step 2: Choose the Box Style
The dieline depends entirely on the structure, such as a reverse tuck end, auto-lock bottom, sleeve, mailer, or lid-and-base rigid box. If you are unsure which structure suits your product, see our comparison of rigid boxes vs folding cartons and browse our packaging styles.
Step 3: Set Up Your Artwork File
- Software: Adobe Illustrator is the industry standard. Supply the native .ai file or a high-resolution, print-ready PDF.
- Scale: always work at 100% scale (1:1) on the dieline you received.
- Layers: keep separate, clearly named layers for the dieline, the artwork, white ink (if any) and each special finish (foil, spot UV, emboss).
- Color mode: CMYK for process printing, with Pantone (PMS) spot colors defined by name for brand-critical colors.
- Images: at least 300 dpi at final size, in CMYK, embedded or packaged with the file.
- Fonts: convert all text to outlines (or embed fonts in the PDF) so nothing reflows or substitutes.
Step 4: Apply Bleed and Safe Zones
- Extend all background colors and images 3 mm beyond every cut line. Without bleed, tiny cutting variations leave white edges.
- Keep logos, text and key graphics at least 3 mm inside cut and fold lines. Folding has a natural tolerance, and elements too close to a crease may wrap onto the next panel.
- Avoid thin borders running parallel to cut lines. Any small cutting shift becomes very visible. If you must use a border, make it generous.
- Check the orientation of every panel. Flaps and panels are often upside down relative to the front, depending on how the box folds.
Step 5: Get Color Right
- Screens lie: monitors show RGB light, while presses print CMYK ink on board. Approve color on a physical proof, not on screen.
- Use Pantone for brand colors that must be consistent across products and print runs.
- Rich black for large areas: for large black backgrounds, a rich black (for example C40 M30 Y30 K100) looks deeper than 100% K alone. Use plain 100% K for small text so it stays sharp.
- Watch total ink coverage: too much ink can cause drying and set-off problems. Follow your printer's limit, typically around 300%.
- Printing on kraft or metallic board: colors look darker on kraft and translucent on metallic. A white ink underlay keeps colors bright where needed.
Step 6: Text, Lines and Barcodes
- Minimum font size: keep body text around 6 pt or larger, and larger still for reversed (white-on-color) text or thin typefaces.
- Minimum line weight: avoid hairlines thinner than about 0.25 pt, as they may break up in printing.
- Barcodes: print in dark ink (ideally 100% K) on a light background, at or above the recommended size, with a clear quiet zone on both sides. Place them on a flat panel, never across a fold.
- Regulatory text: give it a dedicated panel with enough space. For cosmetics, see our cosmetic packaging guide.
Step 7: Prepare Special Finish Layers
Foil stamping, spot UV and embossing each need their own artwork layer so the factory can make the tools and plates:
- Create each finish as solid vector shapes (100% of a spot color) on a separate, clearly named layer, such as "FOIL – gold" or "SPOT UV".
- Align finish layers precisely with the printed artwork underneath.
- Respect minimum detail sizes: very fine lines in foil or emboss may not reproduce cleanly.
- Specify the foil color and type, and whether embossing is blind or registered to print or foil.
Learn more in our guide to packaging finishes.
Step 8: Proof Before Production
- Digital proof (PDF): check content, spelling, layout and panel orientation.
- 3D mock-up: print your artwork on paper, cut it out and fold it, or ask for a 3D rendering. Many orientation errors show up only when the box is folded.
- White sample: an unprinted box made to the dieline to confirm structure and fit with the real product.
- Pre-production sample (PPS): a fully printed and finished sample. Approve this before mass production, because it becomes the color and quality standard.
The Most Common Artwork Mistakes
- Designing on a generic template downloaded online instead of the manufacturer's dieline. Board thickness and tolerances differ, so panels won't line up.
- Missing bleed, which leaves thin white edges after cutting.
- RGB images or colors, which shift unpredictably when converted for print.
- Live fonts that substitute or reflow on another computer.
- Upside-down flaps that are only noticed after the box is folded.
- Artwork on glue areas, which weakens the bond and can cause boxes to pop open.
- Low-resolution logos copied from a website instead of supplied as vector files.
Print-Ready Artwork Checklist
- Artwork placed on the manufacturer's dieline at 100% scale.
- Dieline on its own non-printing layer.
- 3 mm bleed on all cut edges; key elements 3 mm inside cuts and folds.
- CMYK color mode, with Pantone references for brand colors.
- Images at 300 dpi or higher, embedded or packaged.
- All text outlined or fonts embedded.
- Glue areas kept free of ink and coating.
- Special finishes on separate named layers as solid vectors.
- Barcodes tested and placed on a flat, light panel.
- Panel orientation checked on a folded mock-up.
Frequently Asked Questions
Do you provide dielines?
Yes. Tell us your product dimensions and preferred box style, and our engineers will create a dieline for your designer, along with a white sample to confirm fit.
What file formats do you accept?
Adobe Illustrator (.ai) or high-resolution vector PDF files are preferred. We can also work with other formats, but vector files give the best results.
Can you check my artwork before printing?
Yes. Our prepress team reviews every file for bleed, resolution, color mode, font issues and finish layers, and flags problems before production.
Why does my printed color look different from my screen?
Screens display RGB light while printing uses CMYK ink on board, and board type affects the result. Use Pantone references for key colors and approve a physical proof.
Need Help With Your Dieline?
Send us your product measurements and box style, or a sample of the product. Printex China will create the dieline, review your artwork before printing and make physical samples so your packaging is right the first time.